In this tutorial we show how to install the Activiti BPMN platform on JBoss AS 7 and how to deploy and test a sample process in it.
Activiti is a light-weight workflow and Business Process Management (BPM) engine. We have already published an Activiti tutorial about one year ago, now we will explore a newer release and try it with the latest JBoss AS 7.
Start by downloading Activiti latest release http://www.activiti.org/download.html
Installing Activiti
Just unzip the file to a directory of choice and then check out the readme.html that includes pointers to the docs and the release notes. The userguide ( docs/userguide/index.html ) includes instructions on how to get started simple and quick.
The default activiti installation is targeted on H2 in memory Database. We will show here how to switch to MySQL database.
Create the Activiti Database
mysql> create database activiti;
mysql> grant usage on *.* to kermit@localhost identified by ‘kermit’;
mysql> grant all privileges on activiti.* to kermit@localhost ;
Picktup the createdb script: The script is named activiti.mysql.create.engine.sql and is located in the activiti-engine-5.9.jar (Into the org\activiti\db\create folder). Execute the script from your sql session (or any other Sql client application)
mysql> source activiti.mysql.create.engine.sql
Install the Eclipse plugin
Activiti comes with an Eclipse plugin, the Activiti Eclipse Designer, that can be used to graphically model, test and deploy BPMN 2.0 processes.
Go to Help -> Install New Software. In the following panel, click on Add button and fill in the following fields:
Name: Activiti BPMN 2.0 designer
Location: http://activiti.org/designer/update/
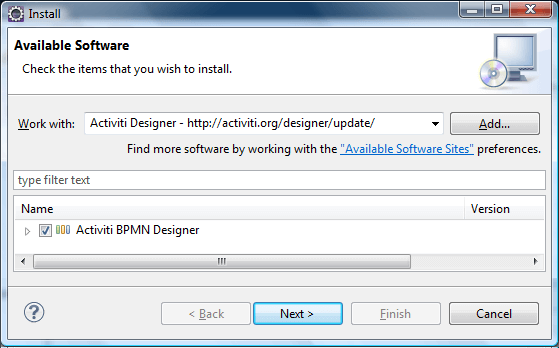
Once installed restart Eclipse.
Create an Activiti Project
Now we will create a new Activiti Project which will provide the archetype for building our first application.
Next add a diagram to it. In this diagram we will simulate a Review process which will be used to approve or reject a candidate.
Create a process where you have an User Task (that will be in charge to evaluate the candidate) and two Mail Tasks where you will dispatch the approval or rejection of your candidate.
Here’s how your process looks like:

Within the User Task (1), select the Main Config Tab and choose as Assignee the user “kermit” (the default administrator).

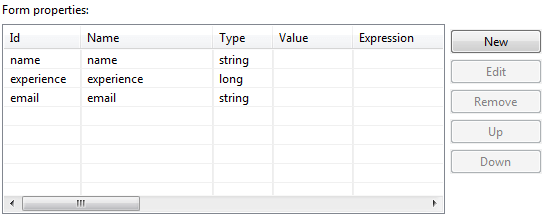
Next move to the Form Tab we will set three properties (name, mail and experience) that can be filled by the Reviewers and will decide the path of the workflow.
Now move to the upper Sequence Flow (2) and add the condition which will be undertaken if approved the candidate (in this simple process we suppose that candidates with over 5 years of experience are accepted).

Now add the corresponding confition in the lower Sequence Flow (3)

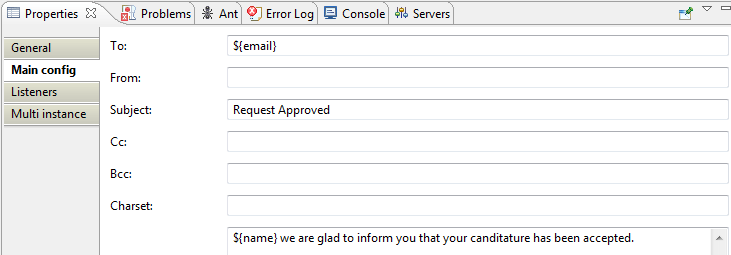
Next move to the Mail task (4) and adds the information necessary to dispatch the mail. The mail will be sent to the address specified by the “mail” variable and, into the text, we will use as well the “name” form property.
Fine, repeat the same for th Mail task(5) in case the candidate is rejected.
Good, now your simple Review process can be uploaded. It should look like this (we have not included for brevity the bpmn graphic notation. You can download the full process from here)
<?xml version="1.0" encoding="UTF-8"?>
<definitions xmlns="http://www.omg.org/spec/BPMN/20100524/MODEL" xmlns:xsi="http://www.w3.org/2001/XMLSchema-instance" xmlns:activiti="http://activiti.org/bpmn" xmlns:bpmndi="http://www.omg.org/spec/BPMN/20100524/DI" xmlns:omgdc="http://www.omg.org/spec/DD/20100524/DC" xmlns:omgdi="http://www.omg.org/spec/DD/20100524/DI" typeLanguage="http://www.w3.org/2001/XMLSchema" expressionLanguage="http://www.w3.org/1999/XPath" targetNamespace="http://www.activiti.org/test">
  <process id="SampleReview" name="SampleReview">
    <startEvent id="startevent1" name="Start"></startEvent>
    <endEvent id="endevent1" name="End"></endEvent>
    <userTask id="usertask1" name="User Task" activiti:assignee="kermit">
      <extensionElements>
        <activiti:formProperty id="name" name="name" type="string"></activiti:formProperty>
        <activiti:formProperty id="experience" name="experience" type="long" required="true"></activiti:formProperty>
        <activiti:formProperty id="email" name="email" type="string"></activiti:formProperty>
      </extensionElements>
    </userTask>
    <serviceTask id="mailtask1" name="Approved" activiti:type="mail">
      <extensionElements>
        <activiti:field name="to" expression="${email}"></activiti:field>
        <activiti:field name="subject" expression="Request Approved"></activiti:field>
        <activiti:field name="html">
          <activiti:expression><![CDATA[${name} we are glad to inform you that your canditature has been accepted.]]></activiti:expression>
        </activiti:field>
      </extensionElements>
    </serviceTask>
    <serviceTask id="mailtask2" name="Rejected" activiti:type="mail">
      <extensionElements>
        <activiti:field name="to" expression="${email}"></activiti:field>
        <activiti:field name="subject" expression="Request Rejected"></activiti:field>
        <activiti:field name="html">
          <activiti:expression><![CDATA[${name} we are sorry to inform you that your canditature has been accepted.]]></activiti:expression>
        </activiti:field>
      </extensionElements>
    </serviceTask>
    <sequenceFlow id="flow1" name="" sourceRef="startevent1" targetRef="usertask1"></sequenceFlow>
    <exclusiveGateway id="exclusivegateway1" name="Exclusive Gateway"></exclusiveGateway>
    <sequenceFlow id="flow2" name="" sourceRef="usertask1" targetRef="exclusivegateway1"></sequenceFlow>
    <sequenceFlow id="flow3" name="" sourceRef="exclusivegateway1" targetRef="mailtask1">
      <conditionExpression xsi:type="tFormalExpression"><![CDATA[${experience > 5}]]></conditionExpression>
    </sequenceFlow>
    <sequenceFlow id="flow4" name="" sourceRef="exclusivegateway1" targetRef="mailtask2">
      <conditionExpression xsi:type="tFormalExpression"><![CDATA[${experience <= 5}]]></conditionExpression>
    </sequenceFlow>
    <sequenceFlow id="flow5" name="" sourceRef="mailtask1" targetRef="endevent1"></sequenceFlow>
    <sequenceFlow id="flow6" name="" sourceRef="mailtask2" targetRef="endevent1"></sequenceFlow>
  </process>
(In order to upload it from the Activiti explorer you can either use a .zip file, a .bar archive or an xml file ending with .bpmn20.xml)
Deploy Activiti Process Explorer on JBoss AS 7
The Activiti process explorer is an handy web application which can be used to manage your processes. It is located into your apps\apache-tomcat-6.0.32\webapps path of your Activiti installation.
In order to enable the deployment of this application on JBoss AS 7 you have:
1) Rename the folder as activiti-explorer.war (so that the AS7 deployer will target is as a web application)
2) Open the applicationContext.xml file which is located in the WEB-INF path of your application and modify it so that it looks like this:
<?xml version="1.0" encoding="UTF-8"?>
<beans xmlns="http://www.springframework.org/schema/beans"
    xmlns:xsi="http://www.w3.org/2001/XMLSchema-instance" xmlns:context="http://www.springframework.org/schema/context"
    xmlns:tx="http://www.springframework.org/schema/tx" xmlns:jee="http://www.springframework.org/schema/jee"
    xsi:schemaLocation="http://www.springframework.org/schema/beans http://www.springframework.org/schema/beans/spring-beans-3.0.xsd
       http://www.springframework.org/schema/context http://www.springframework.org/schema/context/spring-context-3.0.xsd
       http://www.springframework.org/schema/tx http://www.springframework.org/schema/tx/spring-tx-3.0.xsd
       http://www.springframework.org/schema/jee http://www.springframework.org/schema/jee/spring-jee-3.0.xsd">

    <bean id="dbProperties"
        class="org.springframework.beans.factory.config.PropertyPlaceholderConfigurer">
        <property name="location" value="classpath:db.properties" />

        <property name="ignoreUnresolvablePlaceholders" value="true" />
    </bean>

    <bean id="demoDataGenerator" class="org.activiti.explorer.demo.DemoDataGenerator">
        <property name="processEngine" ref="processEngine" />
    </bean>

    <bean id="dataSource" class="org.apache.commons.dbcp.BasicDataSource">
        <property name="driverClassName" value="com.mysql.jdbc.Driver" />
        <property name="url"
            value="jdbc:mysql://localhost:3306/activiti?autoReconnect=true" />
        <property name="username" value="kermit" />
        <property name="password" value="kermit" />
        <property name="defaultAutoCommit" value="false" />
    </bean>

    <bean id="transactionManager"
        class="org.springframework.jdbc.datasource.DataSourceTransactionManager">
        <property name="dataSource" ref="dataSource" />
    </bean>

    <bean id="processEngineConfiguration" class="org.activiti.spring.SpringProcessEngineConfiguration">
        <property name="dataSource" ref="dataSource" />
        <property name="mailServerHost" value="localhost" />
        <property name="mailServerPort" value="25" />
        <property name="mailServerUsername" value="fmarchioni" />
        <property name="mailServerPassword" value="fmarchioni" />
        <property name="transactionManager" ref="transactionManager" />
        <property name="databaseSchemaUpdate" value="true" />
        <property name="jobExecutorActivate" value="true" />
        <property name="customFormTypes">
            <list>
                <ref bean="userFormType" />
            </list>
        </property>
    </bean>

    <bean id="processEngine" class="org.activiti.spring.ProcessEngineFactoryBean"
        destroy-method="destroy">
        <property name="processEngineConfiguration" ref="processEngineConfiguration" />
    </bean>

    <bean id="repositoryService" factory-bean="processEngine"
        factory-method="getRepositoryService" />
    <bean id="runtimeService" factory-bean="processEngine"
        factory-method="getRuntimeService" />
    <bean id="taskService" factory-bean="processEngine"
        factory-method="getTaskService" />
    <bean id="historyService" factory-bean="processEngine"
        factory-method="getHistoryService" />
    <bean id="managementService" factory-bean="processEngine"
        factory-method="getManagementService" />
    <bean id="identityService" factory-bean="processEngine"
        factory-method="getIdentityService" />

    <bean id="activitiLoginHandler" class="org.activiti.explorer.ui.login.DefaultLoginHandler">
        <property name="identityService" ref="identityService" />
    </bean>

    <import resource="activiti-ui-context.xml" />

    <bean id="userFormType" class="org.activiti.explorer.form.UserFormType" />

</beans>
Please notice the Datasource section, which contains the MySql settings for the dataSource Bean. In this case, the simplest way to achieve this is to use the org.apache.commons.dbcp.BasicDataSource.
Using JBoss AS Datasource
If you don’t have to use Apache connection pool and rather want to use JBoss own datasource you have to do a bit more of work, as it will require installing Activiti CDI libraries as well: at first create a datasource on jBoss AS as described in this tutorial:
Then, comment the dataSource bean definition. Instead of it, you will have to reference the datasource through the processEngineConfiguration as shown here:
   <!-- process engine configuration -->
   <bean id="processEngineConfiguration" class="org.activiti.cdi.CdiJtaProcessEngineConfiguration">
      <property name="dataSourceJndiName" value="java:jboss/datasources/MySQLDS" />
      <property name="databaseType" value="mysql" />
      <property name="transactionManager" ref="transactionManager" />
      <property name="transactionsExternallyManaged" value="true" />
      <property name="databaseSchemaUpdate" value="true" />
   </bean>

  <bean id="transactionManager" class="org.springframework.jndi.JndiObjectFactoryBean">
      <property name="jndiName" value="java:jboss/TransactionManager"></property>
      <property name="resourceRef" value="true" />
   </bean>
If you try to deploy the Activiti Explorer with this configuration, the deployer will complain that cannot find the java.lang.ClassNotFoundException: org.activiti.cdi.CdiJtaProcessEngineConfigurationNext. As a matter of fact, the new process engine configuration will require CDI dependencies. They are not included in the default Activiti distribution, you have to pick them up using Maven, with the following dependencies:
<dependencies>
    <dependency>
        <groupId>org.activiti</groupId>
        <artifactId>activiti-cdi</artifactId>
        <version>5.8-SNAPSHOT</version>
    </dependency>
    <dependency>
        <groupId>org.springframework</groupId>
        <artifactId>spring-context</artifactId>
        <version>3.0.3.RELEASE</version>
    </dependency>
    <dependency>
        <groupId>javax</groupId>
        <artifactId>javaee-api</artifactId>
        <version>6.0</version>
        <scope>provided</scope>
    </dependency>
</dependencies>
Finally, once the application is started up, the activiti-cdi.jar will try to boot the process engine. To accomplish this it will lookup a bean implementing the “ProcessEngineLookup” interface. You will have to provide one, extending LocalProcessEngine lookup, which will create a spring-configured process engine:
public class ProcessEngineConfiguration extends LocalProcessEngineLookup {
}
Well, that was a bit lenghty procedure, however if you want to learn more about it, we suggest you looking at this repository which shows how to set up Activiti + CDI on JBoss 7.1.1:
Configure the mail support:
Since this process will deliver an email to the candidate which will be reviewed by you, we will configure a simple mail server solution with Apache James. You can try Apache James which is an opensource mail server, pretty light and simple to get started with it. Download it. Next unzip it and launch the run script which will start the mail server.
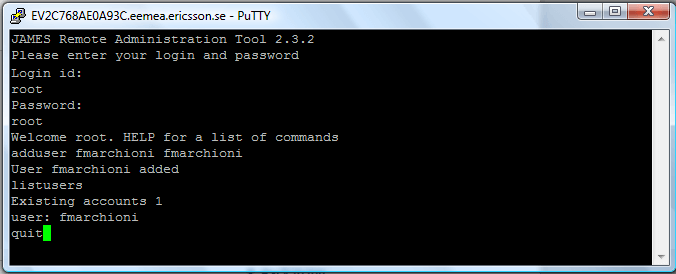
At startup James server just contains an administrative root account, so we will use this to add an user account. Unfortunately James does not provide (as far as I know!) a GUI interface to add users, to do that, telnet to localhost on port 4555 with the command:
telnet localhost 4555
You can log in with the root user name and password. After the login, we’ll add an user. The adduser command expects a username and password combination. After adding users, you can use the listusers command to verify the entries and then exit the remote manager by typing quit. The whole session should look like this:
Now copy the Process Explorer on JBoss AS 7 deployments folder and add a activiti-explorer.war.dodeploy to trigger the deployment of the exploded archive.
That’s all. Start the process explorer with: http://localhost:8080/activiti-explorer/
We have found out some errors in the JBoss console about the GWT GUI libraries. This does not seem to cause any issue however we suggest you picking up the gwt-user-2.3.0 from Grep Code repository. http://grepcode.com/snapshot/repo1.maven.org/maven2/com.google.gwt/gwt-user/2.3.0
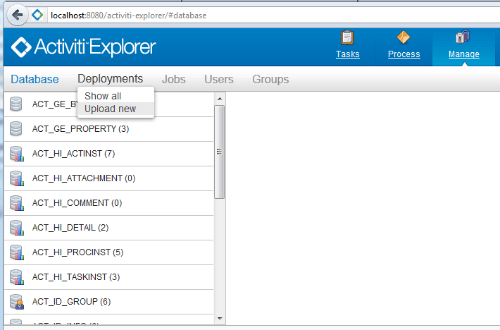
Now login into the Process Explorer console, with one of the built-in administrator kermit/kermit.As first step, upload the process through the “Manage” upper tab and the Deployments menu.
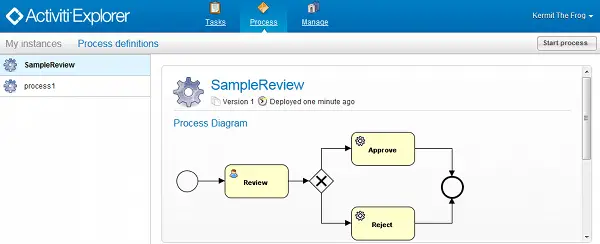
Once deployed the bpmn20 file, move to the “Process” upper tab, where you can review the process picture and start a new instance of it, through the “Start process” button.
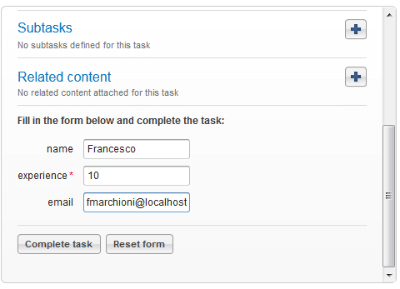
Once started, fill up the form properties which are related to the process. In this example we have filled an “experience” which is over 5 years, thus the expected outcome is to receive a mail containing the approval for the candidate.
Let’s open your mail client (in our example Thunderbird) and verify it:
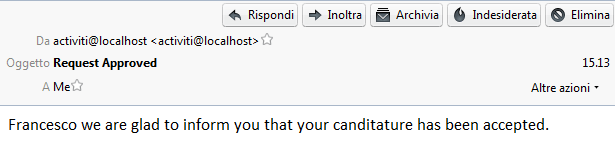
That’s all! In this tutorial we have showed how to run a BPMN 2.0 process using Activiti Engine on JBoss AS 7. In the next one, we will show how to start and manage this process programmatically, using Activiti API. Stay tuned !
Found the article helpful? if so please follow us on Socials


