PrimeFaces AutoComplete displays suggestions while the input is typing. AutoComplete features various options, multiple selections, customizable content and other cool effects. Let’s see how to run a quick example of it.
Set up your Primefaces project
Firstly, to kickstart your Primefaces application include the following dependencies in your project’s pom.xml:
<dependencies>
    <dependency>
        <groupId>jakarta.platform</groupId>
        <artifactId>jakarta.jakartaee-api</artifactId>
        <version>8.0.0</version>
        <scope>provided</scope>
    </dependency>

    <dependency>
        <groupId>org.primefaces</groupId>
        <artifactId>primefaces</artifactId>
        <version>10.0.0</version>
    </dependency>
</dependencies>
With that in place, we are ready to add your first Primefaces Chart.
Create a Primefaces Autocomplete Form
Firstly, we will add an index.html page which contains a textfield and a combobox featuring the autocomplete:
<!DOCTYPE html>
<html xmlns="http://www.w3c.org/1999/xhtml" xmlns:f="http://java.sun.com/jsf/core" xmlns:h="http://xmlns.jcp.org/jsf/html" xmlns:p="http://primefaces.org/ui">
   <h:head />
   <h:body>
      <h:form id="jsfexample">
         <p:panelGrid columns="2">

            <p:outputLabel value="Enter Country" for="@next" />
            <p:autoComplete id="acSimple" value="#{autoCompleteBean.text1}" completeMethod="#{autoCompleteBean.completeText}" scrollHeight="250" />

            <p:outputLabel value="Select Country" for="@next" />
            <p:autoComplete id="dd" dropdown="true" value="#{autoCompleteBean.text2}" completeMethod="#{autoCompleteBean.completeText}" scrollHeight="250" />

         </p:panelGrid>
      </h:form>
   </h:body>
</html>
Let’s see in detail our HTML page:
- To enable autocomplete we have to set to use the autoComplete element with the attribute completeMethod on the field we want to enable auto-completion. The target Bean method will return a List of String objects
- By default a TextField will be used. By setting the attribute “dropdown” to “true” the field will be rendered as a ComboBox.
Additionally, please note the “@next” search expression used in the Label. This search expression finds the next JSF element in the same level of the JSF tree.
Done with the View, let’s code the AutoCompleteBean:
@Named
@RequestScoped
public class AutoCompleteBean {

	private String text1;
	private String text2;

	public List<String> completeText(String query) {
		String queryLowerCase = query.toLowerCase();
		List<String> countryList = new ArrayList<>();
		List<Country> countries = getCountries();

		for (Country country : countries) {
			countryList.add(country.getName());
		}

		return countryList.stream().filter(t -> t.toLowerCase().startsWith(queryLowerCase)).collect(Collectors.toList());
	}

	private List<Country> getCountries() {
		List<Country> countries = new ArrayList<Country>();

		Locale[] locales = Locale.getAvailableLocales();
		for (Locale locale : locales) {
			try {
				String iso = locale.getISO3Country();
				String code = locale.getCountry();
				String name = locale.getDisplayCountry();

				if (!"".equals(iso) && !"".equals(code) && !"".equals(name)) {
					countries.add(new Country(iso, code, name));
				}
			} catch (MissingResourceException ex) {
				ex.printStackTrace();
			}

		}

		return countries;
	}

    // Getters/ Setters omitted
}
As you can see, the AutoComplete requires a target field (text1, text2) to store the Field data. Also, you need to produce a List of String objects. This is done in the completeText method.
The method getCountries collects the list of Country names from Java’s Locale class and stores them in a Java Bean named Country:
class Country {
    private String iso;
    private String code;
    public String name;

    Country(String iso, String code, String name) {
        this.iso = iso;
        this.code = code;
        this.name = name;
    }
}
Running the example AutoComplete application
Once deployed, we can test our application.
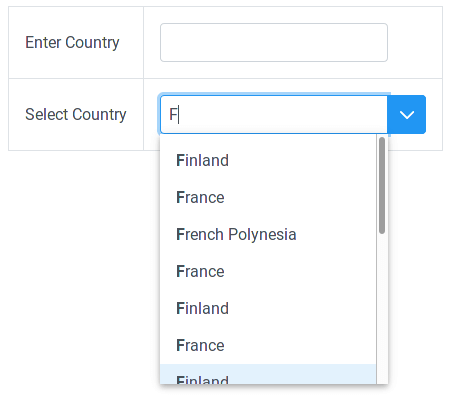
Let’s start from the TextField. As you can see, by default, auto-complete will be triggered when you type the first character:

Likewise, the Autocomplete Combobox allows to type in text and select from the Combo:
Advanced configurations
So far we have showed a basic usage of the Autocomplete feature. It is however possible to customize the fields by setting extra attributes. Let’s see a few of them.
Minimum number of characters
You can define a minimum number of characters to be typed before the hint is displayed. For example, to request a minimum of 3 characters:
<p:autoComplete id="acMinLength" minQueryLength="3" value="#{autoCompleteBean.txt2}"
                completeMethod="#{autoCompleteBean.completeText}" effect="fade" scrollHeight="250"/>
Also, notice we have included as AutoComplete effect to “fade” when the suggestion is displayed.
Maximum number of elements
By default, 7 elelemts are displayed at once. You can change this default, for example, to 10 as follows:
<p:autoComplete id="acMaxResults" maxResults="10" value="#{autoCompleteBean.txt4}"
            completeMethod="#{autoCompleteBean.completeText}" scrollHeight="250"/>
Also, notice we have included as AutoComplete effect to “fade” when the suggestion is displayed.
Using a POJO to AutoComplete the Field
The default example uses a List of String objects to fill up the Autocomplete selection. It is also possible to use a POJO as source of data:
<p:autoComplete id="pojo" value="#{autoCompleteBean.country1}"
                completeMethod="#{autoCompleteBean.completeCountry}"
                var="country" itemLabel="#{country.name}" itemValue="#{country}"
                converter="#{countryConverter}" forceSelection="true" scrollHeight="250"/>
This requires some little changes in the AutoComplete Bean to return a List of POJOs:
public List<Country> completeCountry(String query) {
        String queryLowerCase = query.toLowerCase();
        List<Country> countries = getCountries();
        return countries.stream().filter(t -> t.getName().toLowerCase().contains(queryLowerCase)).collect(Collectors.toList());
}
Besides it, a FacesConverter (named “countryConverter“) needs to be registered. The value assigned to @FacesConverter is converter id which will be used at view level:
@Named
@FacesConverter(value = "countryConverter", managed = true)
public class CountryConverter implements Converter<Country> {

    @Inject
    private CountryService countryService;

	@Override
	public Country getAsObject(FacesContext context, UIComponent component, String value) {
		if (value != null && value.trim().length() > 0) {
            try {
                return countryService.getCountriesAsMap().get(Integer.parseInt(value));
            } catch (NumberFormatException e) {
                throw new ConverterException(new FacesMessage(FacesMessage.SEVERITY_ERROR, "Conversion Error", "Not a valid country."));
            }
        } else {
            return null;
        }
	}

	@Override
	public String getAsString(FacesContext context, UIComponent component, Country value) {
		if (value != null) {
            return String.valueOf(value.getId());
        } else {
            return null;
        }
	}
}
Finally, it is worth mentioning that POJO objects can also retrieved from a remote endpoint. To do that, replace the attribute completeMethod with completeEndpoint:
<p:autoComplete id="pojoRest" widgetVar="countryPojoRest" value="#{autoCompleteBean.country5}"
                var="country" itemLabel="#{country.displayName}" itemValue="#{country}"
                converter="#{countryConverter}"
                completeEndpoint="#{request.contextPath}/rest/country/autocomplete"
                forceSelection="true" emptyMessage="sorry, no suggestions"
                moreText="more items available" scrollHeight="250"/>
Within your remote Endpoint, the List of POJO objects will be returned:
@GET
@Path("itemList")
@Produces("application/json")
public List<Country> getCountries() {
		List<Country> countries = new ArrayList<Country>();

		Locale[] locales = Locale.getAvailableLocales();
		for (Locale locale : locales) {
			try {
				String iso = locale.getISO3Country();
				String code = locale.getCountry();
				String name = locale.getDisplayCountry();

				if (!"".equals(iso) && !"".equals(code) && !"".equals(name)) {
					countries.add(new Country(iso, code, name));
				}
			} catch (MissingResourceException ex) {
				ex.printStackTrace();
			}

		}

		return countries;
}
Conclusion
We have covered how to use the autocomplete feature in PrimeFaces applications to simplify form edting.
Source code for this article: https://github.com/fmarchioni/mastertheboss/tree/master/web/primefaces/autocomplete
Found the article helpful? if so please follow us on Socials


