IMPORTANT: This tutorial is now outdated. Openishift origin has been renamed to OKD (Origin Distibution of Kubernates) and this tutorial contains everything to get started on Openshift: Getting started with Openshift using OKD
Openshift Origin is the upstream community project that builds up OpenShift platform. Openshift origin is built around a core of Docker container, using Kubernetes for cluster containers orchestration. Openshift origin includes also a functional Web application and a CLI interface to build up and manage your applications.
There are several options to install Openshift: the quickest one to get up to speed is by means of the “oc” client tool which features a quickstart option “cluster up” to quickly start the Openshift container.
Prerequisites: You need an available Docker installation: Check the documentation for the right procedure to install Docker for your OS: https://docs.docker.com/engine/getstarted/step_one/
Start by downloading the oc client tool from https://github.com/openshift/origin/releases .
You don’t need any special procedure in order to install it: just extract the archive for your platform and you are done:
$ curl -sSL https://github.com/openshift/origin/releases/download/v1.3.2/openshift-origin-client-tools-v1.3.2-ac1d579-linux-64bit.tar.gz -o oc.tar.gz
Now unpack the downloaded archive:
$ tar xvfz oc.tar.gz
Here’s the content of the unpacked archive:
tree openshift-origin-client-tools-v1.3.2-ac1d579-linux-64bit/
openshift-origin-client-tools-v1.3.2-ac1d579-linux-64bit/
├── LICENSE
├── oc
└── README.md
We suggest you copying the “oc” tool which is a folder which is available in your PATH environment variable:
cp openshift-origin-client-tools-v1.3.2-ac1d579-linux-64bit/ $HOME/somepath
As next step, you need as root/sudoer to edit the /etc/sysconfig/docker file and check that the insecure registry is on. This is needed to allow OpenShift to pull and locally cache images, by deploying a local docker registry.
OPTIONS='--selinux-enabled --insecure-registry 172.30.0.0/16'
That’s it. Restart Docker service:
$ service docker restart
Now you can try starting up Openshift:
$ oc cluster up --version=latest
-- Checking OpenShift client ... OK
-- Checking Docker client ... OK
-- Checking Docker version ... OK
-- Checking for existing OpenShift container ... OK
-- Checking for openshift/origin:v1.3.0 image ...
   Pulling image openshift/origin:v1.3.0
   Pulled 1/3 layers, 37% complete
   Pulled 1/3 layers, 69% complete
   Pulled 2/3 layers, 90% complete
   Pulled 3/3 layers, 100% complete
   Extracting
   Image pull complete
-- Checking Docker daemon configuration ... OK
-- Checking for available ports ...
-- Checking type of volume mount ...
   Using nsenter mounter for OpenShift volumes
-- Creating host directories ... OK
-- Finding server IP ...
   Using 192.168.1.66 as the server IP
-- Starting OpenShift container ...
   Creating initial OpenShift configuration
   Starting OpenShift using container 'origin'
   Waiting for API server to start listening
   OpenShift server started
-- Installing registry ... OK
-- Installing router ... OK
-- Importing image streams ... OK
-- Importing templates ... OK
-- Login to server ... OK
-- Creating initial project "myproject" ... OK
-- Server Information ...
   OpenShift server started.
   The server is accessible via web console at:
       https://192.168.1.66:8443

   You are logged in as:
       User:     developer
       Password: developer

   To login as administrator:
       oc login -u system:admin
If everything goes well, you will be able to read at the bottom of it, that the Openshift server started and the IP Address where the Web console is accessible.
Please note that we are using the latest version of Openshift by passing the –version=latest option. This is recommended as you might stumble upon some incompatibilities related with Docker manifest files.
In the next tutorial we will be testing the Web interface so that we can deploy a JEE application on an Openshift. Right now we will run a simple Hello world test from the Command Line. Start by logging with the developer user:
$ oc login -u developer -p password
Login successful.

You have one project on this server: "myproject"

Using project "myproject".
As you can see, you have logged in the default project, called myproject. Create a file named hello.json which will contain a minimal Pod definition that will load the openshift/hello-openshift Hello world image:
{
  "kind": "Pod",
  "apiVersion": "v1",
  "metadata": {
    "name": "hello-openshift",
    "creationTimestamp": null,
    "labels": {
      "name": "hello-openshift"
    }
  },
  "spec": {
    "containers": [
      {
        "name": "hello-openshift",
        "image": "openshift/hello-openshift",
        "ports": [
          {
            "containerPort": 8080,
            "protocol": "TCP"
          }
        ],
        "resources": {},
        "terminationMessagePath": "/dev/termination-log",
        "imagePullPolicy": "IfNotPresent",
        "capabilities": {},
        "securityContext": {
          "capabilities": {},
          "privileged": false
        }
      }
    ],
    "restartPolicy": "Always",
    "dnsPolicy": "ClusterFirst",
    "serviceAccount": ""
  },
  "status": {}
}
Create the Pod from our JSON file using the oc create command:
$ oc create -f hello.json
pod "hello-openshift" created
Let’s check that the Pod is active:
$ oc get pods
NAME              READY     STATUS    RESTARTS   AGE
hello-openshift   1/1       Running   0          6s
As we don’t have exposed yet the Pod with a Service we need to find out which IP Address has been assigned to our service:
[francesco@localhost ~]$ oc describe pod hello-openshift
Name:			hello-openshift
Namespace:		myproject
Security Policy:	restricted
Node:			192.168.1.66/192.168.1.66
Start Time:		Mon, 16 Jan 2017 11:58:34 +0100
Labels:			name=hello-openshift
Status:			Running
IP:			172.17.0.2
We have omitted part of the output which is quite verbose. Now we can test our Pod with any tools which lands on the default port (8080) at the address 172.17.0.2:
$ curl http://172.17.0.2:8080
Hello OpenShift!
To complete our example, let’s create a Service so that we can abstract from the IP Address assigned to the Pod. We need a Service definition JSON file like the following one:
{
  "kind": "Service",
  "apiVersion": "v1",
  "metadata": {
    "name": "hello-service",
    "labels": {
      "name": "hello-openshift"
    }
  },
  "spec": {
    "selector": {
      "name":"hello-openshift"
    },
    "ports": [
      {
        "protocol": "TCP",
        "port": 8080,
        "targetPort": 8080
      }
    ]
  }
}
We can create the service as usual with the oc create -f option:
$ oc create -f service.json
service "hello-service" created
Let’s verify that the service is now active:
$ oc get services

NAME CLUSTER-IP EXTERNAL-IP PORT(S) AGE
hello-service 172.30.204.0 8080/TCP 2m
Great. Now the last step will be defining a route for our service, so that we can invoke it through it:
$ oc expose service hello-service
route "hello-service" exposed
Let’s double check the route:
$ oc get routes
NAME            HOST/PORT                                     PATH      SERVICES        PORT      TERMINATION
hello-service   hello-service-myproject.192.168.1.66.xip.io             hello-service   8080
As a proof of concept, you can now test your service against the router address:
$ curl http://hello-service-myproject.192.168.1.66.xip.io
Hello OpenShift!
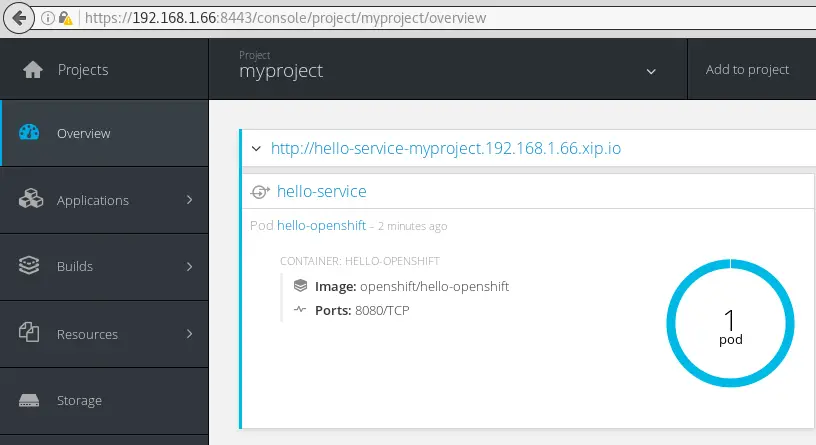
You can check and test as well the service from the Web console at https://192.168.1.66:8443:
A final note. You will see that as you shut down and restart your cluster your projects are not available any more. As a matter of fact out of the box the “oc cluster up” mechanism is ehpemeral. In order to persist data across restarts, specify a valid host directory in the –host-data-dir argument when starting your cluster with oc cluster up.
$ oc cluster up --version=latest --host-data-dir=/some/dir
As long as the same value is specified every time, the data will be preserved across restarts.
If a host data directory is not specified, the data directory used by OpenShift is discarded when the container is destroyed.
Found the article helpful? if so please follow us on Socials


