In this tutorial, we will learn how to send and consume messages to Artemis MQ (Message Queue) using Camel Route. Artemis MQ is a high-performance messaging system that supports the Java Message Service (JMS) API. Camel is an open-source integration framework that provides a powerful routing and mediation engine.
Prerequisites
Before we begin, make sure you have the following prerequisites installed:
- Apache Artemis MQ
- Apache Camel
- Java Development Kit (JDK)
- Integrated Development Environment (IDE) of your choice
Step 1: Set Up the Project
- Create a new Java project in your IDE.
- Add the necessary Apache Camel and Artemis MQ dependencies to your project’s
pom.xmlfile:
<dependency>
    <groupId>org.apache.camel</groupId>
    <artifactId>camel-jms</artifactId>
</dependency>

<dependency>
    <groupId>org.apache.activemq</groupId>
    <artifactId>artemis-jms-client</artifactId>
    <version>2.28.0</version>
</dependency>
Step 2: Start Artemis MQ
To run our example, you can either download Artemis MQ from https://activemq.apache.org/components/artemis/download/
Alternatively you can run ArtemisMQ as Container Image:
docker run --rm -e AMQ_USER=admin -e AMQ_PASSWORD=admin -p 61616:61616 --name artemis quay.io/artemiscloud/activemq-artemis-broker
To learn more about running Artemis MQ in a Container we recommend checking this article: How to run Artemis MQ as Docker Image
Step 3: Define Camel Routes
Create a new Java class, such as JMSDemo, which defines the following Camel routes:
public class JMSDemo {
    public static void main(String[] args) throws Exception {
        CamelContext context = new DefaultCamelContext();
        ActiveMQConnectionFactory connectionFactory = new ActiveMQConnectionFactory("tcp://0.0.0.0:61616");
        connectionFactory.setUser("admin");
        connectionFactory.setPassword("admin");
        JmsComponent jms = new JmsComponent();
        jms.setConnectionFactory(connectionFactory);
        jms.setPreserveMessageQos(true);


        context.addComponent("jms", jms);
        context.addRoutes(
            new RouteBuilder() {
              public void configure() {
                from("timer:foo?period=1s&repeatCount=3")
                    .setBody(simple("Message at ${date:now:yyyy-MM-dd HH:mm:ss}"))
                    .setHeader("JMSMessageID", constant(UUID.randomUUID().toString()))
                    .setHeader("JMSReplyTo", constant("client1"))

                    .to("jms:queue:activemq/queue/TestQueue");


                    from("jms:queue:activemq/queue/TestQueue")
                    .process(
                        new Processor(){

                            @Override
                            public void process(Exchange exchange) throws Exception {

                                Map<String, Object> headers = exchange.getIn().getHeaders();

                                // Print all headers
                                for (Map.Entry<String, Object> entry : headers.entrySet()) {
                                    String headerName = entry.getKey();
                                    Object headerValue = entry.getValue();
                                    System.out.println(headerName + ": " + headerValue);
                                }
                            }

                        }
                    )
                    .log("Received: ${body}");
              }
            });
        context.start();
        Thread.sleep(10000);
        context.stop();
    }

}
Firstly, we are setting up an ActiveMQConnectionFactory with the settings to connect to the Remote Artemis MQ at the address tcp://0.0.0.0:61616
Then, we are sending messages to the JMS Destination jms:queue:activemq/queue/TestQueue through a Timer Component.
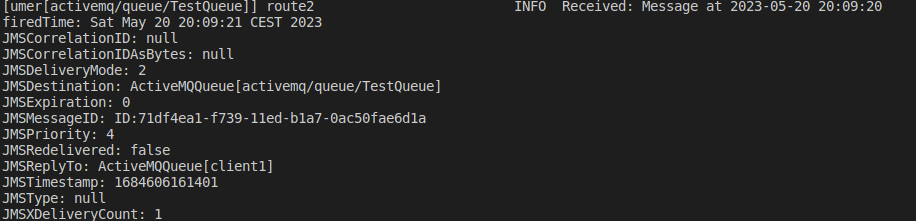
Finally, we are consuming messages from jms:queue:activemq/queue/TestQueue and attaching a Processor to the Message Exchange. This Processor demonstrates how to process the Messaging Headers of the messages. As you can see, when producing Messages we are setting the JMSMessageID and the JMSReplyTo so that this information shows in the Processor.
Running the Camel Route
Then, execute the Camel main class and verify that JMS Messages are produced and consumed and that Headers display on the console:
Conclusion
In conclusion, this tutorial has provided a step-by-step guide to building a Camel route for sending and consuming messages to Artemis MQ. By leveraging the power of Apache Camel and Artemis MQ, developers can easily integrate messaging capabilities into their applications.
Throughout this tutorial, we covered the essential steps, including setting up the project, configuring the Artemis MQ connection, defining Camel routes, and sending/consuming messages. By following these steps, you can establish a seamless communication channel between your application and the messaging system.
Found the article helpful? if so please follow us on Socials


