The following is an Apache Camel. tutorial that shows how to set up and run a simple Camel Route using the Command Line and a tool for editing the Camel project.
If you are new to Apache Camel we recommend checking this tutorial which gives you a basic background about the project and what is used for: What is Apache Camel ?
Assumed you know the basics, let’s start creating an example project.
How to set up a Camel Project
Required tools:
- Java 1.8 or later
- Apache Maven
- A Development Environment of your like (we use IntelliJ Idea in this tutorial)
Start by creating your Camel project as follows from Maven:
$ mvn archetype:generate \
-DarchetypeGroupId=org.apache.camel.archetypes \
-DarchetypeArtifactId=camel-archetype-java \
-DarchetypeVersion=3.7.0 \
-DgroupId=com.mastertheboss.camel \
-DartifactId=camel-helloworld \
-Dversion=1.0-SNAPSHOT
The project camel-helloworld will be created. Now import it in your favorite IDE. In our case we import it into Eclipse:
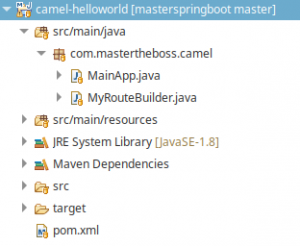
Editing the Camel Project
We will just edit the MainApp class to remove deprecated code and use Camel Main class instead. Here is how it should be like:
import org.apache.camel.main.Main;

public class MainApp {
  public static void main(String...args) throws Exception {
    // use Camels Main class
    Main main = new Main();
    main.configure().addRoutesBuilder(MyRouteBuilder.class);
    main.run(args);
  }
}
The Class MyRouteBuilder which has been created for you is a Java DSL class to route messages.
import org.apache.camel.builder.RouteBuilder;

public class MyRouteBuilder extends RouteBuilder {
  public void configure() {
    from("file:src/data?noop=true")
        .choice()
        .when(xpath("/person/city = 'London'"))
        .log("UK message")
        .to("file:target/messages/uk")
        .otherwise()
        .log("Other message")
        .to("file:target/messages/others");
  }
}
As you can see, all this Class does is to process the input files (leaving them in place, as configured from the ‘noop’ flag) and then perform Content Based routing using an XPath expression.
The XML files are picked up from the folder ‘data’ which is included in your project:
src
├── data
│   ├── message1.xml
│   └── message2.xml
└── main
    ├── java
    │   └── com
    │       └── mastertheboss
    │           └── camel
    │               ├── MainApp.java
    │               └── MyRouteBuilder.java
    └── resources
        └── log4j2.properties
Finally, within the file log4j2.properties you can set custom definitions for your Loggers:
appender.out.type = Console
appender.out.name = out
appender.out.layout.type = PatternLayout
appender.out.layout.pattern = [%30.30t] %-30.30c{1} %-5p %m%n
rootLogger.level = INFO
rootLogger.appenderRef.out.ref = out
The project file (pom.xml) includes the following dependencies in it:
<?xml version="1.0" encoding="UTF-8"?>
<project xmlns="http://maven.apache.org/POM/4.0.0" xmlns:xsi="http://www.w3.org/2001/XMLSchema-instance"
         xsi:schemaLocation="http://maven.apache.org/POM/4.0.0 http://maven.apache.org/maven-v4_0_0.xsd">

  <modelVersion>4.0.0</modelVersion>

  <groupId>com.mastertheboss.camel</groupId>
  <artifactId>camel-helloworld</artifactId>
  <packaging>jar</packaging>
  <version>1.0-SNAPSHOT</version>

  <name>Apache Camel Tutorial</name>

  <properties>
    <project.build.sourceEncoding>UTF-8</project.build.sourceEncoding>
    <project.reporting.outputEncoding>UTF-8</project.reporting.outputEncoding>
  </properties>

  <dependencyManagement>
    <dependencies>
      <!-- Camel BOM -->
      <dependency>
        <groupId>org.apache.camel</groupId>
        <artifactId>camel-parent</artifactId>
        <version>3.7.0</version>
        <scope>import</scope>
        <type>pom</type>
      </dependency>
    </dependencies>
  </dependencyManagement>

  <dependencies>

    <dependency>
      <groupId>org.apache.camel</groupId>
      <artifactId>camel-core</artifactId>
    </dependency>
    <dependency>
      <groupId>org.apache.camel</groupId>
      <artifactId>camel-main</artifactId>
    </dependency>

    <!-- logging -->
    <dependency>
      <groupId>org.apache.logging.log4j</groupId>
      <artifactId>log4j-api</artifactId>
      <scope>runtime</scope>
    </dependency>
    <dependency>
      <groupId>org.apache.logging.log4j</groupId>
      <artifactId>log4j-core</artifactId>
      <scope>runtime</scope>
    </dependency>
    <dependency>
      <groupId>org.apache.logging.log4j</groupId>
      <artifactId>log4j-slf4j-impl</artifactId>
      <scope>runtime</scope>
    </dependency>

    <!-- testing -->
    <dependency>
      <groupId>org.apache.camel</groupId>
      <artifactId>camel-test</artifactId>
      <scope>test</scope>
    </dependency>
  </dependencies>

  <build>
    <defaultGoal>install</defaultGoal>

    <plugins>

      <plugin>
        <groupId>org.apache.camel</groupId>
        <artifactId>camel-maven-plugin</artifactId>
      </plugin>

      <plugin>
        <groupId>org.apache.maven.plugins</groupId>
        <artifactId>maven-compiler-plugin</artifactId>
        <version>3.8.1</version>
        <configuration>
          <source>1.8</source>
          <target>1.8</target>
        </configuration>
      </plugin>
      <plugin>
        <groupId>org.apache.maven.plugins</groupId>
        <artifactId>maven-resources-plugin</artifactId>
        <version>3.1.0</version>
        <configuration>
          <encoding>UTF-8</encoding>
        </configuration>
      </plugin>

      <!-- Allows the example to be run via 'mvn compile exec:java' -->
      <plugin>
        <groupId>org.codehaus.mojo</groupId>
        <artifactId>exec-maven-plugin</artifactId>
        <version>1.6.0</version>
        <configuration>
          <mainClass>com.mastertheboss.camel.MainApp</mainClass>
          <includePluginDependencies>false</includePluginDependencies>
        </configuration>
      </plugin>

    </plugins>
  </build>

</project>
Run the Main class and check from the logs that the files have been routed:
[1) thread #2 - file://src/data] route1
INFO  UK message [1) thread #2 - file://src/data] route1
INFO  Other message
Congratulations! you have just run your first Hello World Camel project!
Source code for Camel Hello world project: https://github.com/fmarchioni/masterspringboot/tree/master/camel/camel-helloworld
Generating an Hello World example using Spring configuration
If you want to create your Spring version of the HelloWorld Camel Example you can use the maven archetype:
mvn archetype:generate \
-DarchetypeGroupId=org.apache.camel.archetypes \
-DarchetypeArtifactId=camel-archetype-spring \
-DarchetypeVersion=3.7.0 \
-DgroupId=com.mastertheboss.camel \
-DartifactId=camel-helloworld-spring \
-Dversion=1.0-SNAPSHOT
The main difference is that the project will not include Java resources but the following camel-context.xml file with the definition of the Camel Context and the route:
<?xml version="1.0" encoding="UTF-8"?><!-- Configures the Camel Context--><beans xmlns="http://www.springframework.org/schema/beans" xmlns:xsi="http://www.w3.org/2001/XMLSchema-instance" xsi:schemaLocation="        http://www.springframework.org/schema/beans http://www.springframework.org/schema/beans/spring-beans.xsd        http://camel.apache.org/schema/spring http://camel.apache.org/schema/spring/camel-spring.xsd">

   <camelContext xmlns="http://camel.apache.org/schema/spring">

      <!-- here is a sample which processes the input files          (leaving them in place - see the 'noop' flag)          then performs content based routing on the message using XPath -->

      <route>

         <from uri="file:src/data?noop=true"/>

         <choice>

            <when>

               <xpath>/person/city = 'London'</xpath>

               <log message="UK message"/>

               <to uri="file:target/messages/uk"/>

            </when>

            <otherwise>

               <log message="Other message"/>

               <to uri="file:target/messages/others"/>

            </otherwise>

         </choice>

      </route>

   </camelContext>

</beans>
You can run the project with:
mvn install camel:runGenerating an Hello World example using Spring Boot
Finally, if you prefer to create a Camel Project using Java and Spring Boot, the following archetype will do:
mvn archetype:generate \
-DarchetypeGroupId=org.apache.camel.archetypes \
-DarchetypeArtifactId=camel-archetype-spring-boot \
-DarchetypeVersion=3.7.0 \
-DgroupId=myGroupId \
-DartifactId=demo
Your project will not include the XML configuration file, but the standard structure of a Spring Boot project:
src
├── main
│   ├── java
│   │   └── myGroupId
│   │       ├── MySpringBean.java
│   │       ├── MySpringBootApplication.java
│   │       └── MySpringBootRouter.java
│   └── resources
│       ├── application.properties
│       └── META-INF
│           ├── LICENSE.txt
│           └── NOTICE.txt
└── test
    ├── java
    │   └── myGroupId
    │       └── MySpringBootApplicationTest.java
    └── resources
As for any Spring Boot project, you can run your Spring Boot camel application with:
mvn install spring-boot:run
Conclusion
This Apache Camel tutorial was a basic introduction to Camel applications. If you want to check a more complex example of Camel application with Spring Boot, see the following article: Camel with Spring Boot example
Found the article helpful? if so please follow us on Socials


