Managing data is one of the most challenging aspects of building software. The Jakarta API, specifically Jakarta Data, offers a straightforward way for Java developers to handle data access without getting bogged down in the technical details of persistence. Its goal is simple: let you focus on your application’s data model while it takes care of the complexity.
The goals of Jakarta API
Jakarta Data provides a consistent API that works across different types of databases—whether you’re using relational tables, document stores, or something else. It doesn’t force you to stick to any particular technology but gives you the freedom to choose what works best for your project.
The API also emphasizes practicality. It’s built around your application’s core logic, so your data operations naturally fit into the way you’ve designed your app. Whether you’re writing queries, defining repositories, or integrating with a storage engine, Jakarta Data helps you keep things organized and easy to work with.
Let’s break down the example code to see how this works in action.
A practical example
In Jakarta Data, the @Repository interface in Jakarta Data is a contract for managing data persistence. It provides methods to interact with the database, such as creating, reading, updating, and deleting records, without requiring developers to write boilerplate code.
- Core Role: It acts as the middleman between your application and the database.
- Annotations: Annotations like
@Insert,@Delete,@Update,@Find, and@Queryallow you to define behavior or custom queries directly in the interface.
In the following example,the CustomerRepository extends CrudRepository, a core Jakarta Data interface that provides basic CRUD (Create, Read, Update, Delete) operations. The repository defines several methods for interacting with the Customer entity, leveraging annotations like @Insert, @Delete, @Update, and @Find:
@Repository
public interface CustomerRepository  extends CrudRepository<Customer, Long>  {

    @Insert
    void addCustomer(Customer customer);

    @Delete
    void removeCustomer(Customer customer);

    @Update
    void updateCustomer(Customer customer);

    @Find
    Optional<Customer> findById(Long id);

    @Query("FROM Customer c where c.name = ?1")
    List<Customer> byName(String name);

    @Query("FROM Customer c ORDER BY c.id")
    List<Customer> all();
}
Besides the @Insert, @Delete, @Update, @Find methods, notice that we can replace JPA standard queries with the @Query annotation, you can define custom queries using the Jakarta Data Query Language (JDQL).
Using the Repository in your Services
The CustomerService class demonstrates how to use the repository to implement the business logic of the application. This class operates as a middle layer, exposing methods for higher-level operations:
@ApplicationScoped
public class CustomerService {

    @Inject
    CustomerRepository repository;

    @Transactional
    public void createCustomer(Customer customer) {
        repository.addCustomer(customer);
    }

    @Transactional
    public Response deleteCustomerById(Long id) {
        Optional<Customer> customer = repository.findById(id);
        if (customer.isPresent()) {
            repository.removeCustomer(customer.get());
            return Response.noContent().build();
        }
        return Response.status(404).build();
    }

   public Response findCustomerById(Long id) {
        Optional<Customer> customer = repository.findById(id);
        return customer.map(c -> Response.ok(c).build())
                       .orElse(Response.status(404).build());
    }

    @Transactional
    public Response updateCustomer(Long id, Customer updatedCustomer) {
        Optional<Customer> existingCustomer = repository.findById(id);
        if (existingCustomer.isPresent()) {
            Customer customer = existingCustomer.get();
            customer.setName(updatedCustomer.getName());
            customer.setSurname(updatedCustomer.getSurname());
            repository.updateCustomer(customer);
            return Response.ok(customer).build(); // Return updated customer
        }
        return Response.status(404).build(); // Return 404 if customer not found
    }

    public List<Customer> findAllCustomers() {
        return repository.all();
    }

    public List<Customer> findAllCustomersByName(String name) {
        return repository.byName(name);
    }
}
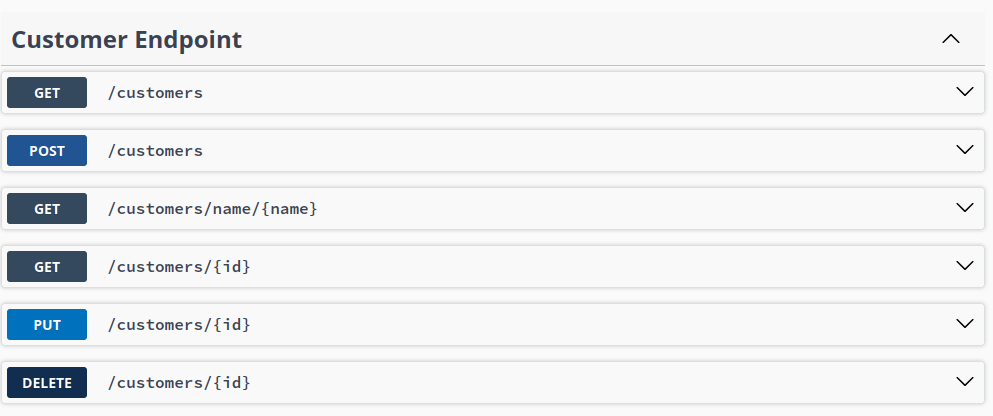
Exposing the Service with a REST Endpoint
Finally, you can expose your service with a REST Endpoint Class which maps every Service method with an HTTP verb. If you want more details about RESTFul services we recommend checking this article: Getting started with RESTEasy and WildFly
Here is the REST Service:
@Path("customers")
@ApplicationScoped
@Produces("application/json")
@Consumes("application/json")
public class CustomerEndpoint {

    @Inject CustomerService service;

    @POST
    public Response create(Customer customer) {
        service.createCustomer(customer);
        return Response.status(201).build();
    }

    @GET
    public List<Customer> getAll() {
        return service.findAllCustomers();
    }

    @GET
    @Path("{id}")
    public Response getCustomerById(@PathParam("id") Long id) {
        return service.findCustomerById(id);
    }

    @GET
    @Path("/name/{name}")
    public List<Customer> getByName(@PathParam("name") String name) {
       return service.findAllCustomersByName(name);

    }

    @PUT
    @Path("{id}")
    public Response updateCustomerById(@PathParam("id") Long id, Customer updatedCustomer) {
        return service.updateCustomer(id, updatedCustomer);
    }

    @DELETE
    @Path("{id}")
    public Response deleteCustomerById(@PathParam("id") Long id) {
        return service.deleteCustomerById(id);
    }
}
Enjoy Jakarta Data with Swagger UI !
Building the Jakarta Data example
In order to build a Jakarta Data application, you will need the following dependencies in your project:
<dependency>
	<groupId>jakarta.data</groupId>
	<artifactId>jakarta.data-api</artifactId>
	<version>${jakartaData.version}</version>
</dependency>

<dependency>
	<groupId>org.hibernate.orm</groupId>
	<artifactId>hibernate-core</artifactId>
	<version>${hibernate.version}</version>
</dependency>
Finally, you will also need Hibernate’s metamodel generator. This tool creates the actual code for Jakarta Data repositories when you compile your project.
Without the generator, Jakarta Data can’t create the behind-the-scenes logic needed to connect your repositories to the database. You can add the metamodel generator as Maven plugin:
<plugin>
	<groupId>org.apache.maven.plugins</groupId>
	<artifactId>maven-compiler-plugin</artifactId>
	<version>3.13.0</version>
	<configuration>
		<annotationProcessorPaths>
			<path>
				<groupId>org.hibernate.orm</groupId>
				<artifactId>hibernate-jpamodelgen</artifactId>
				<version>${hibernate.version}</version>
			</path>
		</annotationProcessorPaths>
	</configuration>
</plugin>
Then, you need a Runtime environment which supports Jakarta Data API. There are several ones such as:
- Quarkus
- WildFly 34 or newer
At the time of writing, WildFly 34 supports Jakarta Data in the preview release as discussed here: https://www.wildfly.org/news/2024/10/10/jakarta-data/
You also need to enable the Jakarta Data extension in your server configuration as follows:
[standalone@localhost:9990 /] /extension=org.wildfly.extension.jakarta.data:add
[standalone@localhost:9990 /] /subsystem=jakarta-data:add
Conclusion
In conclusion, the Jakarta Data API simplifies data access in Java applications by providing a unified, domain-focused approach to working with different databases. Its repository abstraction eliminates the need for boilerplate code, enabling developers to focus on their application’s logic rather than the complexities of persistence.
The example Quarkus Jakarta Data application is available here: https://github.com/fmarchioni/mastertheboss/tree/master/quarkus/jakarta-data