A pretty common issue for Spring Boot application is a 404 Not Found Error for your REST Controllers. Let’s learn how to fix it in one minute!
Problem description
You are running a Spring Boot application which includes a REST Controller, as in this example:
package com.example.controller;
@RestController // shorthand for @Controller and @ResponseBody rolled together
public class ExampleController {

   @RequestMapping( "/hello" )
   public String echo() {
      return "Hello World!";
   }

}
To run your Spring Boot application you are using an Application Main class:
package com.example.application;
@SpringBootApplication
public class MainApp {
   public static void main( String[] args ) {
      SpringApplication.run( MainApp.class, args );
   }
}
Then, you request for the “/hello” endpoint but you get a 404 error:
$ curl http://localhost:8080/hello

{
  "timestamp": 9853742596220,
  "status": 404,
  "error": "Not Found",
  "message": "No message available",
  "path": "/hello"
}
How to fix the issue
To understand what is the issue, we need to focus on the @SpringBootApplication annotation. As a matter of fact, this annotation it’s a combination of three annotations:
@Configuration
@EnableAutoConfiguration
@ComponentScan
The default @ComponentScan annotation (without arguments) tells Spring to scan the current package and all of its sub-packages..
Therefore, only classes under the package “com.example.application” will be scanned. There are two ways to fix it.
Solution #1
The best practice is to place the Main Application class at the root of your project. This way, it will automatically scan and find the Controller class which are available in a sub-package. For example, here is a package structure that works:
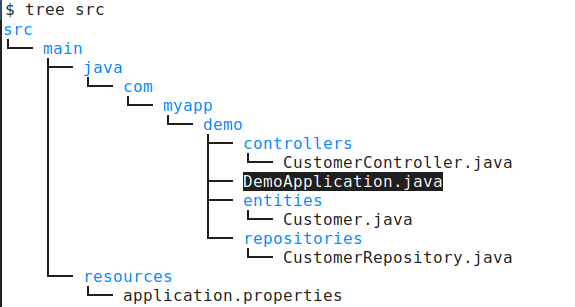
In the above project, we have placed the DemoApplication class at the root of other packages, therefore you will not have issues in finding other classes.
Solution #2
As another option, you could add to your @ComponentScan annotation the starting point used to scan for Classes.
@ComponentScan is a crucial annotation in Spring Boot that automates the process of discovering and registering beans within your application context. It tells Spring to scan specific packages for classes annotated with @Component, @Service, @Repository, @Controller, and their variants.
For example:
@ComponentScan(basePackages = "com.myapp.demo")
@Configuration
public classDemoApplication {
   // ...
}
Besides, you can also include multiple packages when using the @ComponentScan:
@ComponentScan(basePackages = {"com.example", "com.test"})
Finally, you can also apply include and exclude filters to your @ComponentScan annotation:
@ComponentScan(excludeFilters =
@ComponentScan.Filter(type=FilterType.REGEX,
        pattern="com\\.example\\.private\\..*"))
Conclusion
Effectively utilizing the @ComponentScan annotation is crucial for ensuring that all necessary components are discovered and registered within a Spring Boot application. By understanding how component scanning works and employing the various configuration options, developers can overcome challenges related to component discovery in complex project structures. Through careful analysis of package hierarchies and the strategic use of @ComponentScan and its attributes, you can guarantee that all eligible classes are correctly incorporated into the application context, leading to a robust and functional Spring Boot application.


