In this updated article we will discuss how to create and deploy a Jakarta EE 11 ( available since June 2025) application that uses Primefaces as Jakarta Faces implementation. We will build a sample application that will run in microservice-style as WildFly Bootable JAR.
PrimeFaces extends Jakarta Faces by providing a wide range of rich and customizable UI components that are not available in the standard Jakarta Faces implementation. Some of the top picks of PrimeFaces are:
- Rich Set of UI Components: PrimeFaces offers a comprehensive set of UI components that you can easily integrate into your JSF applications. These components include data tables, charts, calendars, dialog boxes, file uploaders, and more.
- Themes and Skinning: PrimeFaces provides a theming mechanism that allows you to easily change the look and feel of your application.
- Ajax Support: PrimeFaces heavily leverages Asynchronous JavaScript and XML (Ajax) to provide smooth and responsive user experiences. It offers built-in Ajax functionality for most components, reducing the need for manual JavaScript coding.
If you are new to Primefaces we recommend checking this introduction article: HelloWorld Primefaces tutorial
On the other hand, if you have got the basics of it, let’s see how to build a modern Jakarta EE 11 application which uses Primefaces.
Primefaces Jakarta EE 11 dependency
Firstly, in order to deploy our Primefaces example in a Jakarta EE 9/10 container you need the following set of dependencies:
<dependency>
        <groupId>jakarta.platform</groupId>
        <artifactId>jakarta.jakartaee-api</artifactId>
        <version>11.0.0</version>
        <scope>provided</scope>
</dependency>
<dependency>
        <groupId>org.primefaces</groupId>
        <artifactId>primefaces</artifactId>
        <version>${primefaces.version}</version>
         <classifier>jakarta</classifier>
</dependency>
With regards to the Primefaces version, we can use the latest version which is (at the time of writing June 2025) the following one:
<primefaces.version>15.0.4</primefaces.version>
Please notice the <classifier> element which you need to set to jakarta. The <classifier> is an optional element that you can use to specify a specific variant of an artifact when multiple versions of the same artifact are available with different characteristics. In our case, we need the version of Primefaces which uses jakarta packages instead of javax.
On the other hand, if you are are using Gradle, then you can specify the jakarta classifier as follows:
dependencies {
    implementation("org.primefaces:primefaces:15.0.4")
}
Working with Jakarta EE 10 ?
On the other hand, if you are working with Jakarta EE 10 you can still use PrimeFaces 12, which is the version I have tested in the earlier:
<dependency>
        <groupId>jakarta.platform</groupId>
        <artifactId>jakarta.jakartaee-api</artifactId>
        <version>1.0.0</version>
        <scope>provided</scope>
</dependency>
<dependency>
        <groupId>org.primefaces</groupId>
        <artifactId>primefaces</artifactId>
        <version>12.0.0</version>
         <classifier>jakarta</classifier>
</dependency>
Coding the Jakarta EE 11 application
Our sample application will be a Primefaces datatable that shows a set of Data from the Database in tabular format. The original tutorial for this demo is in this article: PrimeFaces Datatable in a nutshell
The first change we will need to apply is moving the javax packages to jakarta. For example, here is the ItemView Class which delivers a View from a List of Item objects:
package com.sample.bean;
import java.io.Serializable;
import java.util.List;
import jakarta.annotation.PostConstruct;
import jakarta.faces.application.FacesMessage;
import jakarta.faces.context.FacesContext;
import jakarta.faces.view.ViewScoped;
import jakarta.inject.Inject;
import jakarta.inject.Named;

import org.primefaces.event.RowEditEvent;

import com.sample.model.Item;
import com.sample.service.ItemService;

@Named("dtBasicView")
@ViewScoped
public class ItemView implements Serializable {

    private List<Item> items;

    @Inject
    private ItemService service;

    @PostConstruct
    public void init() {

        items = service.getItems();
    }

    public List<Item> getItems() {
        return items;
    }

    public void setService(ItemService service) {
        this.service = service;
    }

    public void onRowEdit(RowEditEvent<Item> event) {
        FacesMessage msg = new FacesMessage("Product Edited", String.valueOf(event.getObject().getName()));
        FacesContext.getCurrentInstance().addMessage(null, msg);
        service.update(event.getObject());
    }

    public void onRowCancel(RowEditEvent<Item> event) {
        FacesMessage msg = new FacesMessage("Edit Cancelled", String.valueOf(event.getObject().getName()));
        FacesContext.getCurrentInstance().addMessage(null, msg);
    }

    public void onAddNew() {

        Item item = service.generateRandomItem();
        items.add(item);
        System.out.println(item);
        service.save(item);

        FacesMessage msg = new FacesMessage("Item Product added", String.valueOf(item.getId()));
        FacesContext.getCurrentInstance().addMessage(null, msg);
    }
}
Next, if you are using an older Primefaces application, you should be aware that the @ManagedBean annotation as it is not available anymore in the context of a Jakarta EE application. You need to use CDI annotations such as @Named to reference your Beans.
Then, define your Service Class to access your Database. We will also be using JavaFaker library to generate new random Item objects:
@Named
@ApplicationScoped
public class ItemService {
	List<Item> items;

	@PersistenceContext
	private EntityManager em;

	@PostConstruct
	public void init() {
		Query query = em.createQuery("SELECT i FROM Item i");
		items = query.getResultList();
	}

	public List<Item> getItems() {
		return items;
	}

	public void setItems(List<Item> items) {
		this.items = items;
	}

	public Item generateRandomItem() {
		Faker faker = new Faker();

		Item item = new Item();
		item.setCategory(faker.commerce().department());
		item.setName(faker.commerce().productName());
		item.setPrice((Double.valueOf(faker.commerce().price(10, 1000))));
		return item;
	}


	@Transactional
	public void update(Item item) {
		Integer id = item.getId();
		Item itemdb = em.find(Item.class, id);
		itemdb.setCategory(item.getCategory());
		itemdb.setName(item.getName());
		itemdb.setPrice(item.getPrice());
		em.persist(itemdb);

	}

	@Transactional
	public void save(Item item) {
		em.persist(item);
	}

}
For the sake of completeness, here is the Item Class which is our Entity object that maps an equivalent Database table:
@Entity
public class Item {

	@Id
	@GeneratedValue
	Integer id;
	String name;
	String category;
	Double price;

      // getters/setters omitted for brevity

}
Coding the View
Next, we will add a simple index.html which contains a dataTable component within a form and a button to add some random Item objects:
    <h:form id="form">
        <p:growl id="msgs" showDetail="true"/>

        <p:dataTable id="items" widgetVar="items" var="item" value="#{dtBasicView.items}"
                     editable="true">
            <f:facet name="header">
                Jakarta EE 10 demo with Primefaces
            </f:facet>

            <p:ajax event="rowEdit" listener="#{dtBasicView.onRowEdit}" update=":form:msgs"/>
            <p:ajax event="rowEditCancel" listener="#{dtBasicView.onRowCancel}" update=":form:msgs"/>

            <p:column headerText="Name">
                <p:cellEditor>
                    <f:facet name="output"><h:outputText value="#{item.name}"/></f:facet>
                    <f:facet name="input"><p:inputText value="#{item.name}" style="width:100%"
                                                       label="Name"/></f:facet>
                </p:cellEditor>
            </p:column>

            <p:column headerText="Code">
                <p:cellEditor>
                    <f:facet name="output"><h:outputText value="#{item.category}"/></f:facet>
                    <f:facet name="input"><p:inputText id="modelInput" value="#{item.category}"
                                                       style="width:100%"/></f:facet>
                </p:cellEditor>
            </p:column>

            <p:column headerText="Price">
                <p:cellEditor>
                    <f:facet name="output"><h:outputText value="#{item.price}"/></f:facet>
                    <f:facet name="input"><p:inputText value="#{item.price}" style="width:100%"
                                                       label="Price"/></f:facet>
                </p:cellEditor>
            </p:column>


            <p:column style="width:6rem">
                <p:rowEditor/>
            </p:column>
        </p:dataTable>

        <div class="grid mt-3">
            <div class="col-12">
                <p:commandButton value="Add new row" process="@this" update=":form:msgs"
                                 action="#{dtBasicView.onAddNew()}" oncomplete="PF('items').addRow();"/>
            </div>
        </div>

    </h:form>
Note how binding of events work in order to update the datatable dynamically:
- When you Edit a Row of the Table, the dtBasicView.onRowEdit method will be triggered.
- When you Cancel Editing a Row of the Table the dtBasicView.onRowCancel method will be triggered.
- Finally, when you Add a Row, the listener is dtBasicView.onAddNew. After, when this listener completes, the oncomplete method is invoked to update the dataTable,
Building the Bootable JAR
Next, to build a Bootable JAR file, we need to add the set of layers our Web application needs in the wildfly-jar-maven-plugin. For our example, we will need the the jsf, jpa and h2-default-datasource layers:
 <plugin>
        <groupId>org.wildfly.plugins</groupId>
        <artifactId>wildfly-jar-maven-plugin</artifactId>
        <version>${version.bootable-jar}</version>
        <configuration>
          <feature-pack-location>wildfly@maven(org.jboss.universe:community-universe)#${version.wildfly}</feature-pack-location>
          <layers>
            <layer>jsf</layer>
            <layer>jpa</layer>
            <layer>h2-default-datasource</layer>
          </layers>
          <plugin-options>
            <jboss-fork-embedded>${plugin.fork.embedded}</jboss-fork-embedded>
          </plugin-options>
        </configuration>
        <executions>
          <execution>
            <goals>
              <goal>package</goal>
            </goals>
          </execution>
        </executions>
</plugin>
Make sure you use wildfly-jar-maven-plugin 12.0.0.Final or newer if you are bootstrapping WildFly 36 or a more recent version.
Then, we can build the application with:
mvn clean install wildfly-jar:run
WildFly will start, registering our application under the root Web context:
14:10:31,035 INFO  [org.wildfly.extension.undertow] (ServerService Thread Pool -- 36) WFLYUT0021: Registered web context: '/' for server 'default-server'
14:10:31,039 INFO  [org.jboss.as.server] (Controller Boot Thread) WFLYSRV0010: Deployed "jakartaee-demo.war" (runtime-name : "ROOT.war")
14:10:31,068 INFO  [org.jboss.as.server] (Controller Boot Thread) WFLYSRV0212: Resuming server
14:10:31,071 INFO  [org.jboss.as] (Controller Boot Thread) WFLYSRV0025: WildFly Full 28.0.0.Final (WildFly Core 20.0.1.Final) started in 6017ms - Started 327 of 399 services (131 services are lazy, passive or on-demand) - Server configuration file in use: standalone.xml
You can reach it under the default address http://localhost:8080
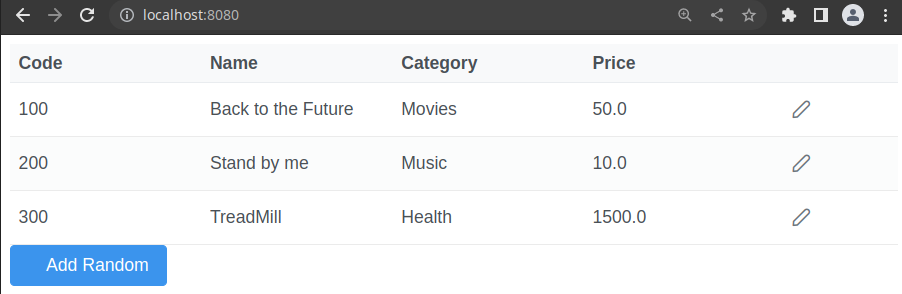
Our application contains some default Item objects in the import.sql script. You can add new Items in the dataTable by clicking on the “Add Random” button or you can Edit the existing ones by clicking on the last column icon.
Conclusion
In this article we discussed how to integrate PrimeFaces with a Jakarta EE 11 application. Overall, PrimeFaces simplifies and enhances the development of JSF-based applications by providing a feature-rich set of UI components, Ajax support, theming, and mobile compatibility. Its active community and ongoing development make it a reliable choice for building modern and responsive web applications with JSF.
Source code for this article: https://github.com/fmarchioni/mastertheboss/tree/master/web/primefaces/prime-jakartaee